Easy Lazy Meatloaf Recipe
Pages
Monday, 19 April 2021
The Lazy Meatloaf Recipe
Saturday, 13 February 2021
Genealogy ; bridging the gap, build your family tree, trace your ancestors, easy, fast and the cheap way.
Build your family tree, trace your ancestors the easy, fastest and cheapest way. Lots of professional expert level of helpful tips and hacks.
Buy the Ebook here from Google Play Bookstore
Genealogy; bridging the gap' by Jenny Cameron
Genealogy; Bridging The Gap, Tracing your lineages, the cheapest, fastest, & easy way.
By Jenny Cameron.
Reviews: “This sent chills down my spine as I do believe you have discovered the true roots of my maternal grandfather!!”
“You are so amazing with all the ancestry information you find out.”
Contents
Introduction
Finding the right ‘MO’ (method of operation)
Structured MO
Bearings
Approach
Sourcing
Tracing
Align
About the author
Introduction
This guidebook was written with the purpose to provide a workable methodology towards your need to ‘bridge the gap’ in genealogy research and, tracing back your ancestral family roots.
Just to introduce myself, a certified business analyst professional with an interest in the application of research, and ancestry history. So far, I have spent four years of my time navigating different websites, forums, and approaches to various platforms as my data mining processes. My main overall purpose throughout was to keep the financial costs down, my time invested over navigating around for data to a minimum possible, managing my time by bypassing any process waste time can consume, and how best to simplify the process along the way for a workable ease of obtaining knowledge ‘sourcing’. Here are my tips that I am passing along to you, I hope you will find this guidebook helpful and that it did serve the purpose to meet your needs of low cost, time saving, and adoption of a structed process with ease. Lets’ get started, but best get started after reading my guide in full here.
Finding the right ‘MO’ (method of operation)
Adopting and using the right ‘MO’ from the start will help you trace, maintain and prioritize for the development of a solution throughout your journey and, when you must retire upon reaching a dead end.
Yes, that is right, you may reach a dead end, and I plan to help you NOT to have invested 80% of your time, to reach 20% of probability meeting your goal when instead you went down a rabbit hole, it can happen, I have been there, but not too often because I adopted the MO and stuck with it.
Perhaps you will retire from the process once the need is met.
Firstly, we need to have a shared understanding of what is a ‘need’? What are your needs throughout this journey? And always, always, refer back to this need as your ‘Bearings’ which I will explain further under the chapter Bearings.
A need is when you have a problem or an opportunity to be addressed. There is a requirement that you trace back your ancestry to further understand your identity, to connect with other distant relatives, or to respond to a need to complete your family tree, or to obtain value that is the importance or usefulness it may provide you.
The ‘journey’ is the process you will undertake as you navigate around your ‘Structured MO’, as you continue through the development of a solution and ends when a solution has presented itself.
The ‘Structured MO’ is a cycle of steps that I advise you to use, I will explain this further in the chapter Structured MO.
Thursday, 14 January 2021
Easy Creamy Lemon Tart Recipe
Easy Creamy Lemon Tart, with a bottom layer of shortbread biscuit.
To make the shortbread biscuit base:
1. Preheat your oven to 350ºF
2. Have a big mixing bowl ready, put 2 & 1/2 cups of all-purpose flour, with 1/2 teaspoon of salt and 2/3 cup of icing sugar/powder. Mix until fairly blended.
3. Using a microwave, microwave 1 cup of butter or margerine (approx for 45 seconds), until melted, pour the 1 cup of melted butter/margerine into the flour bowl, mix thoroughly until fine crumbs texture, quite dry yet equally moist bits of crumbs.
4. Using a non-stick pan or with a non-stick mat placed on your baking tart-oven-pan, place and tightly pat the crumbs mix onto the base of the pan, creating a patted base, the thickness of the shortbread should be about half a centimeter to 1 cm thick, because any thicker a layer of shortbread for this lemon tart recipe will turn out to be quite tough to eat.
If you don't have a pan, you can also use those 'Silicone' ones, for this recipe I used one large square baking silicone, and these silicone for baking is resilient under 425 degrees heat in the oven, and you don't need to pre-grease the base or use baking sheets/wax paper either, which is pretty cool, saves more time!
5. Put this shortbread base into the oven to bake for 20 minutes. Remove from the oven after 20 minutes and let it sit on the side to cool down.
To make the Creamy Lemon Tart:
1.Wash down the seven lemons ready, and using a hand held zest microplane/grater for zesting, zest the skin off three fresh lemons, put that aside.
2. Depending how well you squeeze out the juice of fresh lemons, squeeze the fresh lemon juice of 6 or 7 lemons maximum unto a bowl. I only need 6 fresh lemons because that already gives me 1 cup of juice, and you don't need anymore than 1 cup of it. Remember to remove any unwanted lemon seeds.
3. Add 1 cup of all-purpose flour and using a hand-held mixer or blender (like a bullet blended), whisk this until equally blended together.
4. Preheat your oven to 350ºF
5. Using a small bowl with an electric hand mixer ready, or a food processor, or a bullet blender, place 2 and 1/2 cups of sugar, and also add the grated lemon zest that was put aside. Whisk these two together until equally blended. Set aside for now.
6. Using a Large bowl with an electric hand mixer ready, or a food processor, add eight 8 eggs, whisk less than a minute until loosened in texture, gradually add the sugar and lemon zest mixture a table spoonful at a time, momentarily keep whisking throughout this method of adding the sugar gradually until you have added the whole 2 and 1/2 cups of sugar and zest. You will see a creamy and gooey like mixture.
7. Lastly, pour in to add the 'pre-mixed lemon juice with flour' unto the mixing bowl, whisking together with the egg mixture. This will create a creamy yet soup like texture, this is ok, as long as it is not too watery. Once placed in the oven the heat reacts to all that sugar and helps to caramalize it to a thicker tart like filling, so do not worry.
8. Pour this whisked mixture onto your shortbread biscuit base, and place into the oven to bake for 25 minutes, and do not overbake please.
9. After 25 minutes remove from the oven, it may seem to be runny in texture, not to worry, once it has cooled down, place into the refrigerator to refrigerate overnight, yes 24 hours in the fridge makes that much difference in texture, and best served to eat then.
Enjoy! and just so you know, I love this recipe, it is one of my most baked goods for me to enjoy just to myself ever since I realized the benefits of eating fresh lemons into my diet, it really does help with hypertension.
Did you know facts: Lemon is one of the best remedies for hypertension. It is known to make the blood vessels soft and flexible, lowering blood pressure level. Lemon contains high amounts of Vitamin C, which acts as an anti-oxidant, removing free radicals from the body.
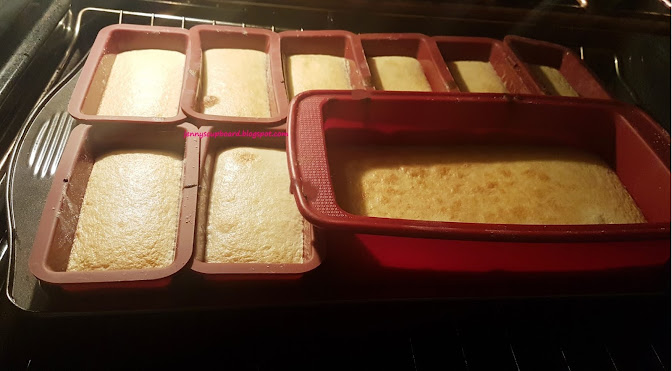
Above photo shows how much this recipe can make, I used one silicone loaf pan of normal bread loaf size, and eight "mini loaf sized" silicone -size: 13.7cm x 7cm x 4.5cm. The mini loaf pans I use to freeze away once it's been refrigerated for 24hrs, they make great gifts too as they are mini in sizes, less hassle to carry and cute.


